Multi-level approvals let your organization require more than one approver for expense reports, cash advances, and trip requests — for example, "Manager approves up to $5,000, Director up to $25,000, CFO above that." This guide walks you through configuring the feature, assigning users, and understanding how approvals flow at runtime in Eloope.
How multi-level approvals work
Instead of a single manager approving a submission, multi-level approval chains pass each item through a sequence of reviewers. For example:
Manager > Department Head > Finance
Each approver in the chain reviews the submission and either approves it (forwarding it to the next level), rejects it (sending it back to the submitter), or approves and forwards it to a specific reviewer. A submission is fully approved only when every pending approval in the chain has been completed. Once that happens, it moves to the next stage — reimbursement for reports, disbursement for advances, or completion for trips.
The number of approval levels and the routing rules depend on your organization's configuration and plan.
Before you start
Multi-level approvals are available on the Starter plan and above. If you're on a lower tier, the option to add additional levels appears locked in the Hierarchy tab. Upgrade from Settings > Billing to enable the feature.
You'll need administrator access to configure the settings below.
Step 1 — Define your approval levels
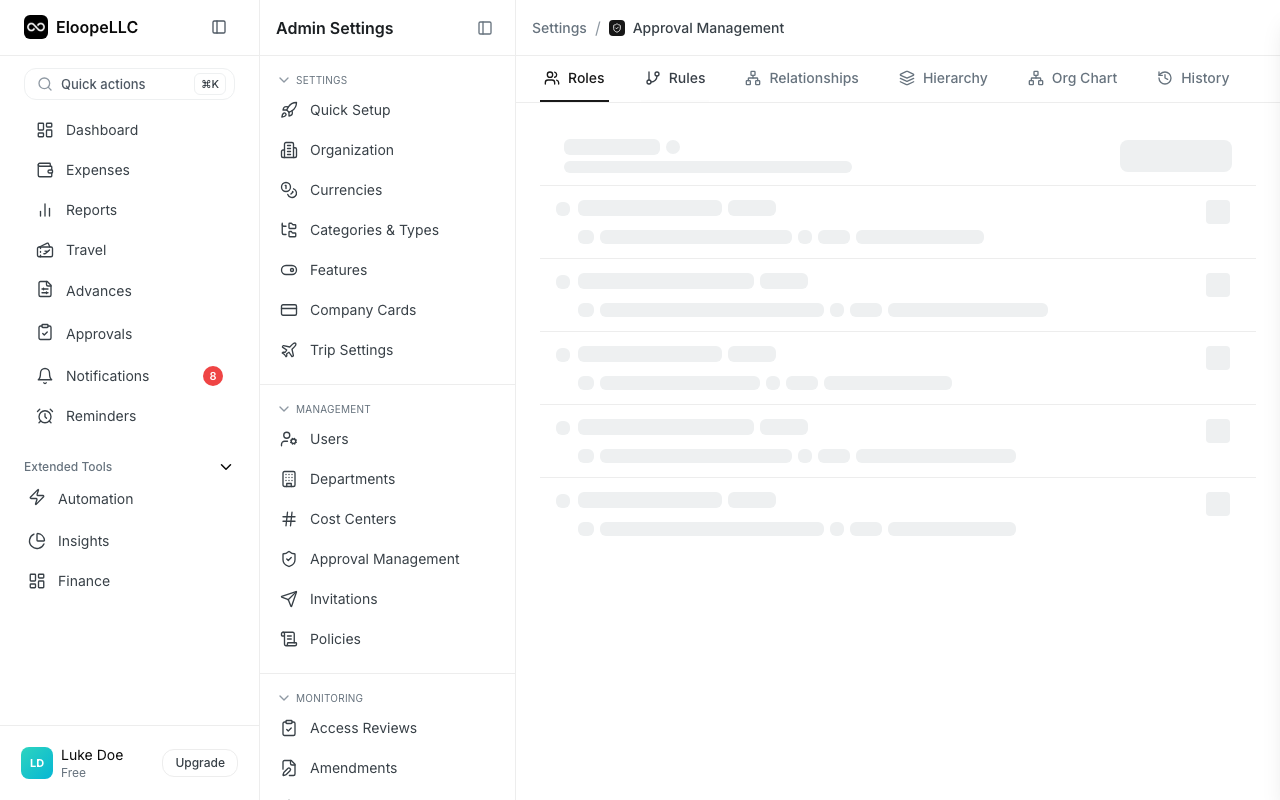
Go to Settings > Approval Management > Hierarchy.
Each level represents a tier of approval authority — Manager, Director, CFO, and so on. For each level you create, set:
- Code and display name — for example,
L1"Manager",L2"Director". - Can approve — turn this on for any level that should be able to act on submissions.
- Approval limit — the maximum amount this level can approve (leave blank for unlimited).
- Department scope — whether the level can only approve for users in their own department, or across the organization.
- Color — the visual badge color for the level.
A typical setup:
| Level | Name | Approval limit |
|---|---|---|
| L1 | Manager | $5,000 |
| L2 | Director | $25,000 |
| L3 | CFO | Unlimited |
Eloope supports up to 7 hierarchy levels (L1–L7).
Step 2 — Assign users to levels
Go to Settings > Users > Manage Users and edit each user. Set their Hierarchy Level to match one of the levels you defined in Step 1.
This is what gives a user the authority to approve at that tier. A user assigned to L2 can approve anything up to the L2 limit.
Tip: A user can be assigned to a level even if they aren't anyone's direct manager — what matters is their authority, not who reports to them.
Step 3 — Set reporting relationships
Go to Settings > Approval Management > Relationships.
For each user, set their direct manager. This is the default first approver when that user submits anything. Without a reporting relationship, submissions can't be routed automatically — they'll need to be handled by an administrator.
You can:
- Add relationships individually
- Bulk-import via CSV
- View the org chart on the Org Chart sub-tab
- Audit changes on the Activity sub-tab
Step 4 (optional) — Add routing rules
Go to Settings > Approval Management > Rules.
Routing rules let you override the default chain when specific conditions are met. Conditions can match on:
- Amount — e.g.,
amount > $20,000 - Category / expense type — e.g.,
expense type is Travel(supports any-of matching with theinoperator, so a single rule can cover multiple types) - Department — e.g.,
department is Engineering - Submitter role — e.g.,
submitter is a Director or above - Policy, submitter, and other contextual fields
Examples:
- "If amount > $20,000, route directly to the CFO regardless of submitter."
- "If expense type is Travel or Lodging, send to the Travel Manager."
- "If department is Engineering, route to the Engineering Director."
- "If submitter's role is Sales Director, skip L1 and go to the VP of Sales."
Rules are evaluated at submission time, top-to-bottom — the first matching rule wins. If no rule matches, the system falls back to the default chain (the submitter's direct manager). Drag the grip handle on a rule to change its priority, or use Bulk reorder to rearrange multiple rules at once.
Test rules before they go live
Click Test Rules in the rules header to open the simulator. Enter sample report values (amount, department, policy, submitter, expense type, date) and the simulator shows you exactly which rule would match and who the resolved approver would be.
Nothing is saved — it's a dry run that uses the same evaluator the runtime uses, so the result you see in the simulator is the result you'll get on a real submission.
Manage existing rules
Each rule has a "..." menu with the following actions:
- Edit — change the conditions, priority, or action
- Clone — start a new rule from an existing one as a template (the cloned rule starts inactive — review and activate when ready)
- Deactivate — temporarily turn a rule off without deleting it (useful for time-bound exceptions, deal reviews, or audit periods)
- Delete — remove a rule permanently
Each rule also shows "Last edited <relative time> by <user>" with a tooltip for the absolute timestamp, so you always know who changed what and when.
What the system blocks at save time
When you save a rule, Eloope validates that everything it references still exists in your organization:
- The selected approver must be an active user (or a known role like Submitter's Manager or CFO).
- Any departments, policies, expense types, or users referenced by conditions must exist.
If any of these references are stale (for example, a department was deleted), the save is rejected with a clear error message so you can fix the rule before it silently fails on a real submission.
How approvals flow at runtime
When someone submits an expense report, advance, or trip:
- Routing rules are evaluated first. If a rule matches, the submission is routed to the rule's specified approver. The submitter receives a notification telling them who the report was routed to and why, so they're never surprised by an unfamiliar approver name.
- Otherwise, the chain falls back to the submitter's direct manager from Reporting Relationships.
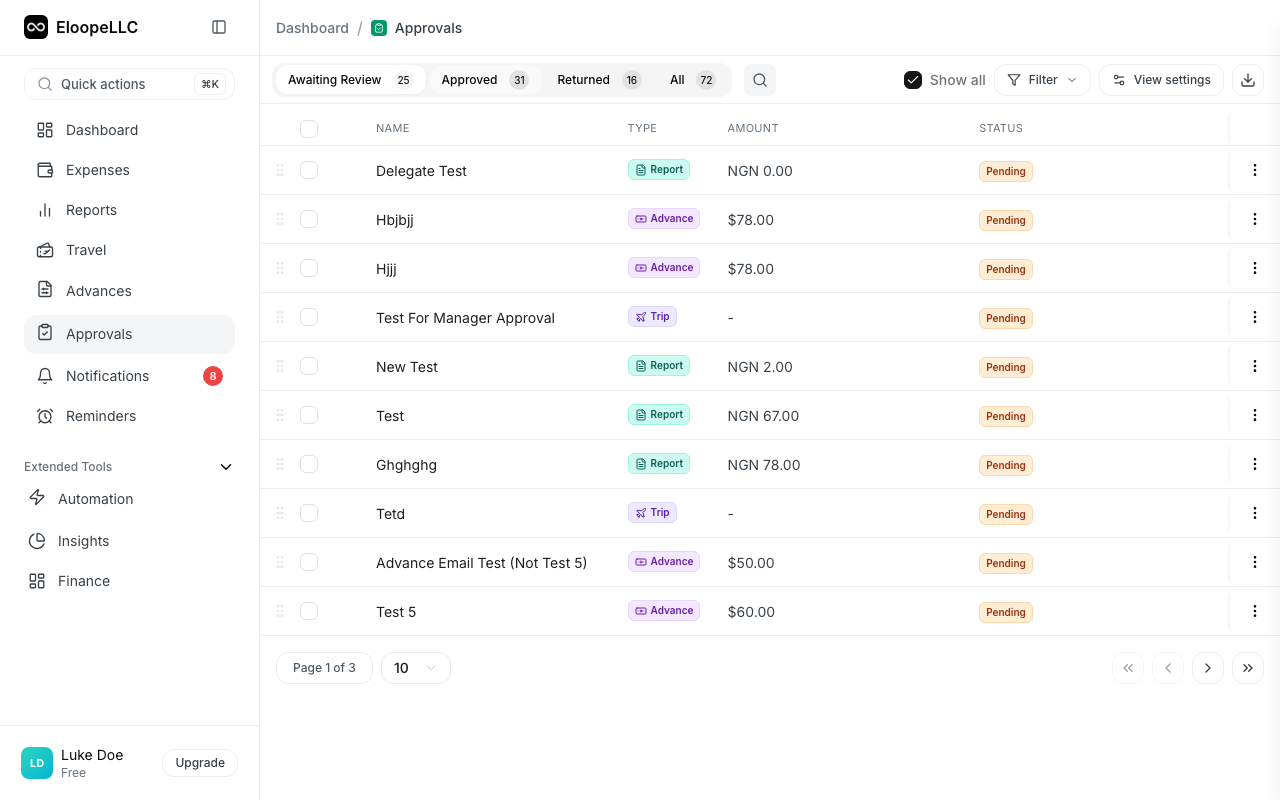
- The approver sees the item in their Approvals queue and can:
- Approve — completes their level.
- Reject — sends it back to the submitter with a reason.
- Approve and Forward — approves and adds another approver to the chain. This is how chains can extend dynamically beyond what's pre-configured.
A submission is fully approved only when every pending approval in the chain has been completed.
Auditing routing decisions: Every routing outcome is recorded in the report's audit log — including which rule matched, who was assigned, and (when no rule matches but rules exist) a note explaining that the default chain was used. Admins can see the full decision trail on each report's detail page, so when someone asks "why did this report go to X?" you have an answer.
Hierarchy vs. routing rules — what's the difference?
These work together, not as alternatives:
- Hierarchy and Relationships define your organization's structure: who has authority and who is the default approver for each submitter. They always apply.
- Routing rules define exceptions: "when X happens, deviate from the default." If no rule matches, the default chain runs.
Think of hierarchy as the "ground truth" for your organization, and routing rules as targeted overrides for specific conditions.
Approve and forward
Eloope supports two forwarding modes when approving at your level:
Serial forwarding (Review After Me): The selected user reviews only after you approve. The workflow pauses until they complete their review.
Parallel forwarding (Review Together): Both of you review simultaneously. All approvers must approve before the item moves to the next stage.
To approve and forward:
- Open the item from your Approvals queue.
- Review the expenses.
- Click Approve & Forward.
- Select the next reviewer from the dropdown.
- Choose Review After Me or Review Together.
- Add optional approval and forwarding reasons.
- Click Approve & Forward.
The next approver receives a notification. You can track the report's progress from the approval detail view, which shows a visual stepper timeline of all approval levels.
Track approval progress
The approval detail view shows a visual stepper timeline with the status of each approval level:
- Approved: This level has approved the submission (green checkmark).
- Current: The submission is waiting for review at this level (blue highlight).
- Pending: This level has not yet received the submission.
- Rejected: This level rejected the submission (red X, workflow stops).
- Skipped: This level was bypassed through forwarding.
- Cancelled: An upper-level approval was recalled.
Each level card shows the approver name, decision, decision date, and any comments or reasons provided. Both the submitter and approvers can see where a submission is in the approval chain at any time.
Example scenarios
Scenario A — Standard submission
- Alice submits a $500 expense.
- No routing rule matches.
- Default chain: Alice → her manager Bob (L1).
- Bob approves; the report is fully approved.
Scenario B — High-amount escalation
- Alice submits a $30,000 advance.
- Rule fires:
amount > $20,000 → route to role:CFO. - The advance goes directly to the CFO, skipping Bob.
- CFO approves; the advance is fully approved.
Scenario C — Mid-chain forwarding
- Alice submits a $10,000 report.
- No rule matches → goes to her manager Bob (L1, $5k limit).
- Bob doesn't have authority for $10k, so he uses Approve & Forward to send it to Carol (L2 Director).
- Carol approves; the report is fully approved.
Scenario D — Parallel approval
- Alice submits a sensitive trip request.
- Bob receives it and uses Approve & Forward, choosing Review Together (parallel) mode, to add Carol.
- Both Bob and Carol must approve before the trip is fully approved.
Things to know
- Editing amounts mid-approval (advances): If you change an advance's amount while it's still pending, the approval chain is automatically rebuilt to reflect the new amount and any updated routing rule matches. If any approval step has already been completed, the amount change is blocked — submit a new request instead.
- Out of office: If an approver is on OOO, their substitute can approve in their place without changing the chain. Configure substitutes from the user's profile.
- Deactivated users: When a user is deactivated, their pending approvals are automatically reassigned to their manager (or an administrator as fallback) so nothing gets stuck.
- Recall: Approvers can recall their approval within a configurable time window if they made a mistake.
- Auto-escalation: Approvals that go past their due date are automatically escalated. Your admin can configure the action (remind, escalate, auto-approve, or auto-reject) and the timer.
- Reports and expenses: Once a report is submitted, its expenses are locked from editing — this prevents bypassing amount-based routing by silently changing the total.
- Rejection at any level: If any approver in the chain rejects, the submission goes back to the submitter. After fixing the issues and resubmitting, the chain starts again from the beginning.
Frequently asked questions
Do I need both hierarchy levels and routing rules?
You only strictly need hierarchy levels and reporting relationships — that's the minimum for multi-level to work. Routing rules are optional but powerful for handling exceptions.
How do I check what a routing rule will do without submitting a real report?
Open Settings → Approval Management → Rules and click Test Rules. Enter sample report values and the simulator shows you the matched rule and the resolved approver. It uses the same evaluator the runtime uses, so the simulator and a real submission can never disagree.
What happens if a submission has no eligible approver?
If no rule matches and the submitter has no manager, the submission can't progress automatically. An administrator will need to step in, or you'll need to configure routing to cover that case.
Can the same user appear at multiple levels?
Yes. A senior manager can serve as the default L1 for their direct reports and as an L2 escalation target via routing rules.
Are hierarchy levels and routing rules per-organization?
Yes. Each organization has its own configuration; nothing is shared across organizations.
Can I model parallel approvals (two people both need to approve)?
Yes — when using Approve & Forward, choose Review Together (parallel) instead of Review After Me (serial). The submission is only approved once every parallel approval is completed.
What's the difference between OOO substitution and delegation?
- OOO is temporary, time-bounded, and intended for vacation or leave. The substitute approves on the original approver's behalf without changing the chain.
- Delegation is a longer-term grant of approval authority that can include permission to act independently.
Can I see the full approval chain for an item I submitted?
Yes. Open the report, advance, or trip detail page and switch to the Approval Status tab. You'll see every level, who approved, who's pending, and any forwarding history.